
Windows 98 and Windows NT version of Apcupsd
General
The Windows version of apcupsd has been tested on Win95, Win98, WinMe, WinNT, and Win2000 systems. This version of apcupsd has been built to run under the CYGWIN environment, which provides many of the features of Unix on Windows systems. It also permitted a rapid port with very few source code changes, which means that the Windows version is for the most part running code that has long proved stable on Unix systems. Even though the Win32 version of apcupsd is a port that relies on many Unix features, it is just the same a true Windows program. When running, it is perfectly integrated with Windows and displays its icon in the system icon tray, and provides a system tray menu to obtain additional information on how apcupsd is running (status and events dialogue boxes). If so desired, it can also be stopped by using the system tray menu, though this should normally never be necessary.Once installed apcupsd normally runs as a system service. This means that it is immediately started by the operating system when the system is booted, and runs in the background even if there is no user logged into the system.
Installation
Normally, you will install the Windows version of Apcupsd from the binaries. This install is somewhat Unix like since you do many parts of the installation by hand. To install the binaries, you need WinZip.- Simply double click
on the winapcupsd-3.8.4.tar.gz icon. The actual name of
the icon will vary from one release version to another.
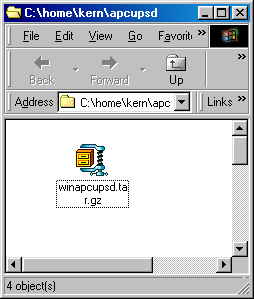
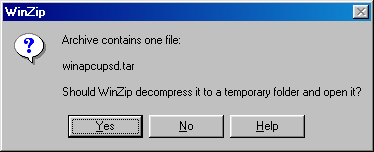
- When Zip says that it has one file and asks if it should unpack it
into a temporary file, respond with Yes.
- Ensure that you extract all files and that the extraction will go
into C:\
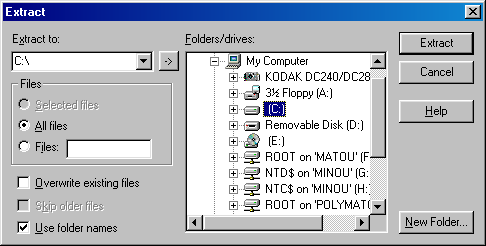
This installation assumes that you do not have CYGWIN installed on your computer. If you do, and you use mount points, you may need to do a special manual installation.
Once you have unzipped the binaries, open a window pointing to the binary installation folder (normally c:\apcupsd). This folder should contain folders with the name bin, etc, examples, and manual. If and when you no longer need them, the examples and manual sub-folders of the c:\apcupsd directory may be removed.
Continuing the installation process:
- Open the directory c:\apcupsd\etc\apcupsd in the Windows Explorer by
Clicking on the apcupsd folder then on the etc folder,
then on the apcupsd folder. Finally
double click on the file apcupsd.conf and edit it to contain the
values appropriate for your site. In most cases, no changes will
be needed, but if you are not using COM1 for your serial port,
you will need to set the DEVICE configuration directive to
the correct serial port. Note, if you are using WinNT or Win2000,
the operating system may probe the port attempting to attach a serial
mouse. This will cause apcupsd to be unable to communicate
with the serial port. If this happens, or out of precaution, you
can edit the c:\boot.ini file. Find the line that looks
something like the following:
multi(0)disk(0)rdisk(0)partition(1)\WINNT="Windows NT Workstation Version 4.00"
and add the following to the end of the line: /NoSerialMice:COM1 (or COM2 depending on what you want to use). The new line should look similar to:
multi(0)disk(0)rdisk(0)partition(1)\WINNT="Windows NT Workstation Version 4.00" /NoSerialMice:COM1
where the only thing you have changed is to append to the end of the line. This addition will prevent the operating system from interferring with apcupsd
- Then return to c:\apcupsd and open on the bin folder so that you see its contents.
- To do the final step of installation, double click on the setup.bat
program. This script will setup the appropriate mount points for the
directories that apcupsd uses, it will install apcupsd in the
system registry, and on Windows 98, it will start apcupsd running.
If everything went well, you will get something similar to the following output in a DOS shell window:

What is important to verify in the DOS window is that the root directory \ is mounted on device c:\.
The DOS window will be followed immediately by a Windows dialogue box as follows:
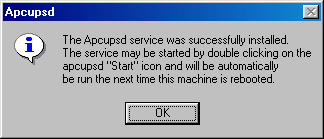
- On Windows 98, to actually start the service, either reboot
the machine, which is not necessary, or open a DOS shell window,
and type the following commands:
cd c:\apcupsd\bin
apcupsd /service
Alternatively, you can go to the c:\apcupsd\bin folder with the Explorer and double click on the Start icon.
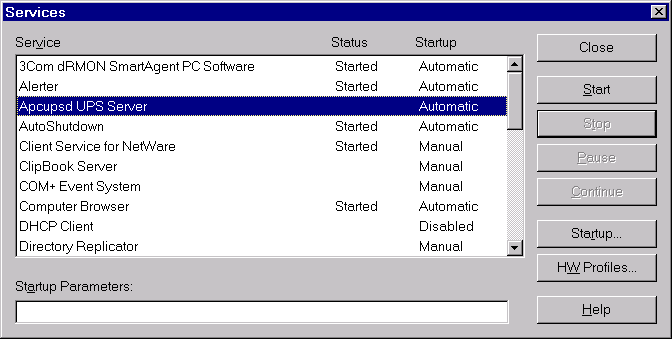
- On Windows NT, to start the service, either reboot
the machine, which is not necessary, or go to the Control Panel,
open the Services folder and start
the Apcupsd daemon program by selecting the
Apcupsd UPS Server and then clicking on the Start button as shown
below:
 If the Services dialog reports a problem, it is normally because
your DEVICE statement does not contain the correct serial port
name.
When the UPS switches to the battery, the battery icon will reappear in the
system tray. While the UPS is online, if the battery is not at least 99% charged,
the plug icon will become a plug with a lightning bolt in the middle
![]() to indicate
that the battery is charging.
to indicate
that the battery is charging.
Installation Directory
The Win32 version of apcupsd must reside in the c:\apcupsd\ directory, and there must be a c:\tmp directory on your machine. The installation will do this automatically, and we recommend that you do not attempt to place apcupsd in another directory. If you do so, you are on your own, and you will need to do a rebuild of the source.Testing
It is hard to over emphasize the need to do a full testing of your installation of apcupsd as there are a number of reasons why it may not behave properly in a real power failure situation.Please read the Testing chapter of this document for general instructions on testing the Win32 version. However, on Win32 systems, there is no Unix system log file, so if something goes wrong, look in the file c:\apcupsd\etc\apcupsd\apcupsd.events where apcupsd normally logs its events, and you will generally find more detailed information on why the program is not working. The most common cause of problems is either improper configuration of the cable type, or an incorrect address for the serial port.
Upgrading
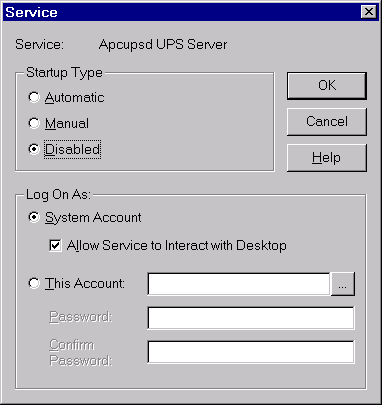
On Win98 and Win95 systems, to upgrade to a new release, simply stop apcupsd by using the tray icon and selecting the Close Apcupsd menu item, or by double clicking on the Stop icon located in the c:\apcupsd\bin directory, then apply the upgrade and restart apcupsd.On WinNT systems (and Win2000 systems), you may stop apcupsd as indicated abover or alternatively you may stop apcupsd by using the Services item in the Control Panel. In addition, at least on my system, there seems to be a WinNT bug that causes the system to prevent apcupsd.exe from being overwritten even though the file is no longer being used. This is manifested by an error message when attempting load a new version and overwrite the old apcupsd.exe (the extract part of WinZip as described above). To circumvent this problem (if it happens to you), after shutting down the running version of apcupsd, through the Services dialogue in the Control Panel, first click on the Stop button:

then click on the Startup ... button, and in the Startup dialogue select the Disabled button to disable apcupsd:
After closing the dialogues, reboot the system, typical of Microsoft :-(. When the system comes backup, apcupsd will not be automatically launched as a service, and you can install the new version. To reinstate apcupsd as an automatic service, using the Control Panel: reset apcupsd to Automatic startup in the Startup dialogue, then restart apcupsd in the Services dialogue as shown above in the installation instructions.
Post Installation
After installing apcupsd and before running it, you should check the contents of two files to ensure that it is configured properly for your system. The first is c:\apcupsd\etc\apcupsd\apcupsd.conf. You will probably need to change your UPSCABLE directive, your UPSTYPE and possibly your DEVICE directives. Please refer to the configuration section of this manual for more details.The second file that you should examine is c:\apcupsd\etc\apcupsd\apccontrol. This file is called by apcupsd when events (power loss, etc) are generated. It permits the user to program handling the event. In particular, it permits the user to be notified of the events. For the Win32 version, each event is programmed to display a Windows popup dialogue box. If your machine is mostly unattended, you may want to comment out some of these popup dialogue boxes by putting a pound sign (#) in column one of the appropriate line.
Problem Areas
In addition to possible problems of reinstallation or upgrade on WinNT systems, as noted above, we have discovered the following problem: On some Windows systems, the domain resolution does not seem to work if you have not configured a DNS server in the Network section of the Control Panel. This problem should be apparent only when running a master or a slave configuration. In this case, when you specify the name of the master or the slave machine(s) in your apcupsd.conf file, apcupsd will be unable to resolve the name to a valid IP address. To circumvent this problem, simply enter all machine addresses as an IP address rather than a domain name, or alternatively, ensure that you have a valid DNS server configured on your system (often not the case on Win32 systems). For example, instead of using the directive:MASTER my.master.com use something like:
MASTER 192.168.1.54 where you replace the IP address with your actuall IP address.
Also, on WinNT systems, the PIF files in /apcupsd/bin used for starting and stopping apcupsd do not work. Use the services control panel instead.
On Win95 systems, there are reports that the PIF files do not work. If you find that to be the case, the simplest solution is to use the batch files that we have supplied in the c:/apcupsd/bin directory. Also, on Win95 systems, we have an unconfirmed report that indicates that apcupsd does not start automatically as a service even though the Registry has been properly updated. If you experience this problem, a work around is to put a shortcut to apcupsd in the StartUp folder.
Utility Functions
The directory c:\apcupsd\bin contains six utility routines (actually .pif files) that you may find useful. They are:Start Stop Install Uninstall ups-events ups-statusAny of these utilities may be used on any system, with the exception of the Start utility, which cannot be used on WinNT and Win2000 systems. On those systems, the apcupsd service must always be started through the Services sub-dialogue of the Control Panel.
The Install and Uninstall utilities install and uninstall apcupsd from the system registry only. All other pieces (files) of apcupsd remain intact. It is not absolutely necessary for apcupsd to be installed in the registry as it can run as a regular program. However, if it is not installed in the registry, it cannot be run as a service.
The functions of Stop, ups-events, and ups-status can be more easily invoked by right clicking on the apcupsd icon in the system tray and selecting the desired function from the popup menu.
Disclaimer
Some of the features such as EEPROM programming have not been exhaustively tested on Win32 systems. If at all possible, we recommend not to use it as a network master on Win95, Win98, and WinMe due to the instability of those operating systems.Some items to note:
- This version of apcupsd will not attempt to shut off the UPS power when the battery is exhausted. Thus if the power returns before the UPS completely shuts down, your computer may not reboot automatically. This is because we do not know how to regain control after the disks have been synced in order to shut off the UPS power. If you absolutely need this feature, you might consider using the KILLDELAY configuration directive. Please see the Configuration Section of this document for more details.
- When apcupsd detects important events, it calls c:\apcupsd\etc\apcupsd\apccontrol, which is a Unix shell script. You may modify this script to suit your particular needs. Currently, it puts a Windows dialogue on the screen with a brief explanation of the event. If these dialogues annoy you, you can remove or comment out the calls to popup from this file.
Email Notification of Events
On Win95/98 systems, it is possible to receive notification of apcupsd events that are passed to apccontrol. This is possible using a simple email program that unfortunately is not functioning 100% correctly. In addition, I (Kern) was not able to make this program work on WinNT while apcupsd is running as a service under the system account (it works fine with any user account).If you wish to try this program on Win95/98 systems, look at the files named changeme, commfailure, commok, onbattery, and mainsback in the directory c:\apcupsd\examples. To use them, you must modify the SYSADMIN variable to have a valid email address, then copy the files into the directory c:\apcupsd\etc\apcupsd.
Command Line Options Specific to the Windows Version
These options are not normally seen or used by the user, and are documented here only for information purposes. At the current time, to change the default options, you must either manually run apcupsd or you must manually edit the system registry and modify the appropriate entries.In order to avoid option clashes between the options necessary for apcupsd to run on Windows and the standard apcupsd options, all Windows specific options are signaled with a forward slash character (/), while as usual, the standard apcupsd options are signaled with a minus (-), or a minus minus (--). All the standard apcupsd options can be used on the Windows version. In addition, the following Windows only options are implemented:
- /servicehelper
- Run the service helper application
- /service
- Start apcupsdas a service
- /run
- Run the apcupsd application
- /install
- Install apcupsd as a service in the system registry
- /remove
- Uninstall apcupsd from the system registry
- /about
- Show the apcupsd about dialogue box
- /status
- Show the apcupsd status dialogue box
- /events
- Show the apcupsd events dialogue box
- /kill
- Stop any running apcupsd
- /help
- Show the apcupsd help dialogue box
Because I have not yet figured out how to execute apcupsd after the system shutdown and before the system halt, there is as of this moment no way for apcupsd to cause the UPS to shut off the power. This means that if the UPS does not automatically shutdown, and the power returns, your system will not be automatically rebooted. This could be resolved by the use of the --kill-on-powerfail option, but the use of this option could cause the power to be cut off while your machine is still running. See the section on Shutdown Sequence in the testing chapter of this document for a more complete discussion of this subject. If you are still interested in trying to get this to work, please look at the code that is commented out in c:\apcupsd\etc\apcupsd\apccontrol under the doshutdown case.
An alternative to the --kill-on-powerfaile option is to use the KILLDELAY configuration directive as explained in the Configuration Section of this document.
Building the Win32 Version from the Source
If you have the source code, follow the standard procedures for building apcupsd on Unix in the Installation Section of this manual. Please don't forget to look at the Win32 specific instructions.